Archive | cameras RSS for this section

The New Lumix DMC-GF1! Does it Compare to the Olympus E-P1? How About DSLR’s?

lumix-gf1
Most of the camera world is excited over the upcomming release of the Panasonic Lumix DMC-GF1 digital mirco 3/4 camera (12 megapixels). The big question is: How will the GF1 will measure up to the Opympus E-p1, and how will this camera compete with DSLR’s ?
Comparing this to a DSLR is tough since I would not put this in the same catagory. There are quite a few differences. To mention a couple, it doesn’t have a mirror, or an optical viewfinder like DLSR’s. However the  GF1 does have an electronic viewfinder that is optional and attaches to the hotshoe (which gives it a step up over the e-p1 in my book). It will be interesting to see how well the autofocus works since it is based on the autofocus system of  EVF cameras.
When it comes to comparing it to the E-P1, it is easier to compare than with a DSLR.  It shares a lot of the same functions and technology. However, we will have to wait for the test results to find out who the winner is.

The price is supposed to be around $900 ( which kicks butt over the Olumpus E-p1) and is geared toward DSLR customers who don’t want the bulk of the bigger camera but still want the creativity,quality and performance.
Here is my question. Can  you call it a rangefinder? Seriously, I don’t know. With traditional rangefinders, the viewer doesn’t see through the lens.  With the electronic viewfinder, you will see through the lens. I will leave that for the marketing department to decide.
The two really big benefits for me are the fact that I can attach Leica M  lenses to this camera and the viewfinder.  You can attach the Leica lenses to the E-p1 also, but I really like the fact that the GF1 has a viewfinder. That steals the show!

Where and What to Buy For My Next Camera?

I have had several questions in the last month on where and what to buy for equipment. Well, you should buy from me at very high prices so I can become a millionaire.  No really, don’t buy from me. I have never been able to offer discount prices.  Here is the deal.  I always buy local, from a small camera shop. If I can’t find it there I alway buy from B and H out of New York City.
When I lived in Missoula, MT, I got to know Mike and the other employees at The Dark Room on Higgins St. I even sold my Hasselblad through them. It is always nice to have friends who will help you out and I consider them my friends.
If you do not have a local camera shop, use B and H. I have worked with several other online sources and the experience left me sour.  With B and H you get a good price and great service.  I trust them.  So, buy from me at double the price, or use local, or B and H.
Now you want to know what kind of camera to buy to get started?  Hmmmm. What I would buy and what you should buy are going to be two different things. I want the Leica S2, and I really think Santa should get that for my Christmas gift. Realistically I probably won’t be getting that for Xmas ( I will be lucky if I get coal).
What should you buy to get started?  I was a Canon guy and still believe that you get the best bang for your buck from getting a Canon Rebel with the kit lens and then go and buy a 50mm 1.8 lens and a 70-200 l series lens.  The Canon system is a good one to start out on.  But what about Nikon?  They are good too.  I just don’t know a lot about the Nikon system since I have always used Canon.
 I now use a Panasonic Lumix DMC-L1K. The reason is because I am a camera snob.
Not really, I just really like Leica lenses the camera I use comes in a package with one.
I hope that answers some of your questions. Let me know if you have any questions and please leave comments and bookmark this page.  Thanks:)

Oh  here is the camera I want. It costs $23,000 for the body(then you have to buy the lenses). What a screaming deal!

Leica S2 SLR Digital Camera

Mystic Forest

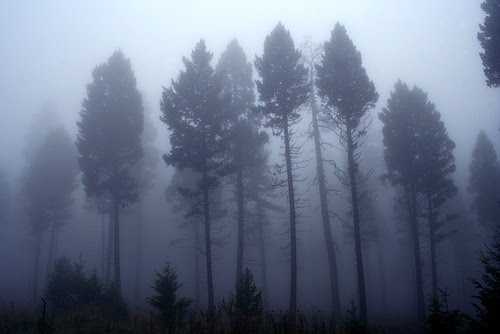
I took this photo about 2 years ago.  The fog was pretty thick and it was very pretty. It was taken in Montana, near Missoula. This is one of those shots where I happened to have my camera with me.  I always carry my camera now because you never know if you will miss a good shot. Luckily for me, I had my camera on me that day.

10 Tips for Better Photography!

1.Don’t have a tripod?
Set your camera on a bean bag.
2.Shooting in Rain?
To avoid getting your camera wet use a ziplock plastic bag.
3.Want to shoot close-ups but don’t want to spend the money on a new macro lens?
Buy a reversal ring. They cost anywhere from $10 to $30.
4.Do you have old lenses that do not fit on your new camera?
There are adaptor rings out there now that will make it so you can put almost any lens on any camera. I have one that allows me to but a Hasselblad lens on a Canon digital camera (Don’t know what a Hasselblad is? Google it.).
5.Need a reflector for a photo shoot?
Wear a white t-shirt and use yourself as a reflector. Or  aluminum foil on a peice of cardboard works great. A small one can be used to lighten the shadows of a flower.
6.Speaking of flowers, do you have an ugly background behind the flower?  Take a piece of colored paper and place it on the background, or use an 8×10 print of a photo you have taken to liven it up a bit!
7. Do you worry that you are going to scratch up a nice lens when putting it in a back pack or bag?  Wrap it in a sock.
8.Want to create a soft focus look?
Use an old pair of pantyhose over the lens. White will look diffent than black or nude so have fun experimenting.
9. Need some software to edit photos?
Download Picassa 3 for free and start to experiment.
10. Want to become a better photographer?
Be patient, go out and do it, and keep on learning!  You will never get good if you just wish for it 🙂

My Favorite Place for Family Photos!!!!

You are going to think I am crazy and the truth is that I am a little bit. When it comes to photographing my family, the best place I have found is the kitchen table.  What the? Yes, I am serious and I will tell you why.  It’s easy, and the kids can’t run away. LOL. Seriously, I love to get shots of my fam at the kitchen table. There are always fun photos like kids with pudding or spaghetti all over them. Then they get a little older and they look at you so tenderly.  My daughter is at the stage where she looks and me and says “I love you Daddy”. It melts my heart. Anyway, next time you are sitting down for a good meal at the table, break out your camera and have some fun. Thanks for visiting, don’t forget to bookmark this blog and if you have questions or want to know about something, let me know. Frank, don’t worry. I’m getting ready to do a post for you on which f-stop to use in which situation.

Being a Bad Weather Friend!

Tonight I was out in a rain storm having fun.  A few posts ago I told you that bad weather is your friend.  This is what I got from the storm. Hope you enjoy!Storm over Cedar City Utah

Family Photos Without Freakin’ out the Kids (Tips on Photographing Children)

This was taken off my old blog. Hope you enjoy!
Almost everyone wants better photos of their families.  So here are a few tips on how to get those shots that only professionals get (not really, anyone can get them!).
1. When you want someone on the other side of the camera to smile, smile!!!!!!  Right now your thinking I am crazy right?  Well, I might be a little but it takes a lot of practice to get to serious crazy.  What I mean is the photographer (you) need to smile at your subject if you want them to smile.
2. The best thing you can do when trying to get you kids to pose for you is to not pose them. Let them do what they usually do.  And don’t get impatient and yell or threaten them. Think about it. Would you be happy if your mom said, “Stop crying or I’m gonna give you something to cry about!” With kids you have to be really patient.  I know. It’s hard not to yell at your kids when it’s so much fun. (kidding again :))
3. This is a great way to get kids’ attention.  Do you have a cell phone? When you want a kid to look at the camera, make your cell phone ring!  They always look at it. Make sure it is by the camera when it rings.
4. With digital you can take multiple shots without charging up a huge bill for film and printing. So shoot away. Take a lot of shots. This way when you get a blink or bad expression, you will at least get a lot of  them. Ha Ha. What I meant to say was that you have a better chance of getting a good shot when you take a whole bunch of shots.  You might hit the lottery and get an awsome one.
Now that I have given you some advice, here are a few shots of my fam.
Family shot that don't suck!!
My girl swimming
Superboy
This is the most important thing to remember when shooting family and kids. Have fun. Because if you are not having fun, no one is!
Let me know if you need any clarification on this and thanks for visiting my blog.  Hey, if you like the blog, please bookmark it so you can return often 🙂

What’s Depth of Field? Let’s Not Be Shallow.


In photography, depth of field is the portion of a photo that appears sharp. Lenses can only focus on one object at a time, but you can control what is in focus in your photograph by using your aperture (see lesson on aperture if you don’t know what I am talking about).
When photographing a landscape you would usually want a lot of the picture in focus. You would use f/16 or f/22 for a landscape. If you use f/22 you are going to have a lot of the photo that will be sharp. In photo terms, you will have a deep DOF.
If you are photographing a person (portrait) you are usually going to want a shallow DOF so the background will be out of focus. Most portraits are taken at F/8. The reason for using F/8 is that at this fstop (aperture) an average person’s head will be in focus and the background will not be in focus. Not having the background in focus will draw attention to the subject. Now if your subject has a huge head (we used to call my little brother pumpkin head cause his noggin was big; we don’t call him that anymore cause he is about 6 inches taller than me and he would kick my @#%$), use a smaller f/stop like f/11 or f/16. Really, I’m just kidding, f/8 should be a standard for most portraits.
There are three things that determine DOF.
1.Subject distance (how far away the subject is from the camera). The closer a subject is to the camera the shallower the DOF is.
2.The lens focal length. If you are using a 500 mm lens there will be less DOF.
3.The lens f/stop(aperture). You should know what this is from the lesson on f/stops. Basically, the wider your f/stop is, f/4 or f/5.6, the shallower the DOF will be. That is why if you are shooting a landscape you want to use f/22 or f/16, because you will have a lot of DOF.


Shallow depth of field -taken at f2/8

Shallow depth of field -taken at f2/8
Medium DOF. Taken at f/8

Medium DOF. Taken at f/8
Deep Depth of Field

Deep Depth of Field f/22
You can see the diffences in how much of the photograph is in focus. With the headshot of the little girl, only her eye and a few strands of hair are in focus. The middle photo of the hitchhiker was taken at f/8. This makes the subject in focus and while the background is out of focus. In the lake above the whole thing is in focus. This photo was taken at f/22. Imagine if I had really shallow DOF on the lake. The trees in back would be out of focus or maybe the front of the photo would not be in focus. That would not make for an interesting picture.
I hope I have been clear. If you need help or do not understand, post a comment and I can help you more. Anyway, thanks for visiting my blog. Bookmark me and visit often, and if you need anything -specific lessons or tips- let me know.
Oh, and if my pumpkin head brother reads this I want him to know that I hold him in the highest regards. You are a wonderful person, Chris.

First Lesson on How to use Depth of Field

This post is for Frank.
Here is what he wrote:
“Mr Johnson, good stuff here. I found myself taking some notes to take with me the next time I go out to shoot. You make some excellent points and you made me realize some things that I was doing wrong. Filling the frame lesson was actually an “a ha” moment for me.
I learned about your site from “notshootingonauto”. I have just moved from auto mode to aperture priority. Still trying to figure out what fstops to use for what situation but I see you
have outlined some good guidelines.
Pls don’t stop your training, it is helping me bigtime.”
Well, here is the answer to help you out. I will be breaking it into a few posts so that it is easier to follow.
I will first tackle the fstop you would use to photograph landscapes. So, you ask, which fstop should I use when photographing a landscape?
I would use f/22 or f/16 in a landscape. In a landscape I usually want everything in the photograph in focus. Using a small aperture will help to acomplish this. If you have questions on depth of field or what depth of field is, please read the post above. I have included a photo (below) that I took for an example of when you should use f/22 or f/16. Also keep in mind that with a small aperture, you will have to use a longer shutter speed. You might need to put your camera on a tripod if your shutter speed is too low. Thanks for visiting my blog and if you have any questions let me know. thanks:)

Fill’er Up Man!!!!


My goal here is to help others become better photographers. What I do is offer free lessons (and you can request a topic) on photography. For the first lesson on this blog I have chosen to talk about filling the frame. I have another blog, http://buffaloz.wordpress.com/ that I do the same thing on. Sometimes the lessons will overlap and I will post the lesson on both blogs. Her is my first lesson on Blogger. I took this photo about 2 years ago and it fits for the lesson so here it goes, my first photo lesson on Blogger. It is really not the best example but I know that you guys who read this stuff are smart and will understand what I am pointing out.
Filling the frame is the name of the game (LOL). Lets first discuss the photo below.
mushroom
As you can see, I did not fill the frame in this photo. A lot of photographers will take a photo of a person and will leave a lot of room at the top and will put the head of the person in the middle of the photo. That is bad. Next time, for a more pleasing result put the head of the person near the top of the frame. Don’t believe me? I dare you. Just try it. Anyway, as you can see there is a lot of dead space at the top of the photo above. Now look at the photograph below.
mushroom the right way
In this photograph I have filled the frame. This is more pleasing to the eye and also draws the eye to the subject. Also, notice how the background is very bright in the first photo? Not good. Usually in a photograph the eye will go to the brightest spot in a photo. I don’t want the eye to look at the background, I want the viewer to look at the mushrooms. So, if you want a good assignment for the next week or so, work on filling the frame. It is best to do it while you are taking the picture. You might need to move in closer to the subject or zoom in, but do it and you will see the difference. I promise. If you do forget to do it while you are taking the shot, then fix it afterwards by cropping the photo. Let me know if you have any questions and good luck 🙂